Site: Danish | English
Moto Guzzi frame numbers - is your bike what's its supposed to be ?
Gasoline - will a Moto Guzzi run on unleaded gasoline ?
Expected mileage of parts - a VERY rough guide to the expected lifetime of various parts.
Tuning - information on what will make it go faster.
Brake caliper overhaul - how-to guide.
Wiring - more warnings than help, I guess.
Wiring charts - see or download here.
Carburetor - Dell Orto Manual online
Carburetor - drawings, charts, and a how-to guide.
Gearing - Contains a nice utility for calculating gear ratios,
Special tools - see why you'll need them.
O-rings, seals, and gaskets - what you need to repair.
Technical : The complex stuff - exciting but heavy reading, take your time.
Please contact Gregory Bender with any questions, corrections, or suggestions for improvement.
Technical
Wiring - more warnings than help, I guess.
Approx. 75 % of all break downs on the road, is caused by an error in the electrical system.
So why don't we service wires and electrical components a little better ?
Quite simple, most people are scared out of their pants by the thought of touching the wiring harness, because they haven't got a clue what's going on in there. Its black magic, dark forces and a little bit of voodoo going on in the wires.
I'll not try to teach you all about electric power on motor cycles, but with the statistic statement above in mind, I'll give you a number of advices:
- Disconnect the connectors (not all of them at the same time) while they are still working properly, and fill the connector housings with silicone grease (NOT HARDENING SILICONE RUBBER !). This will prevent wiring problems caused by corroded connectors. Note that this treatment must be done before you get in trouble - silicone grease can prevent a problem, not cure it.
- Check all wiring routes, especially around the steering head. The wiring must be routed so its isolation wont be damaged by rubbing on bike parts.
- If you must repair wires, do it with a soldering iron and heat shrinking tube. NOT with the screw type connectors and electrical tape.
- The crimp-on connector that is used on an existing wire to make an extra power outlet is to be avoided. When you press the knife-like metal parts onto the existing wire you will either make a very poor connection that will corrode in a short time, or simple cut the wire in two. DO NOT USE THESE, its a safe way into trouble.
- If you exchange connectors, crimp the new ones on with a proper tool - not a leatherman pocket tool, a cable cutter or a hammer !
- The original Bosch fuse box used on older Guzzi's isn't too stable, but that's a problem easily fixed. Install a Hella fuse box designed for the modern car type flat fuses. Its not that hard.
- Take a look at Leo's experiences with wiring repair here:
If you have bought yourself a bike with a very bad wiring harness, or a previous owner have tried to make the wiring himself, you might be tempted to tear all wires from the bike and make a new harness from scratch. Before you start, think carefully:
- Start by walking to the nearest mirror and take a close look at the person in there: Are you really able to build a new harness and make it work. Your bike wont be much of a pleasure to you if it doesn't work properly when you are done.
- Plan ahead when to do it. Let me suggest that you make this a winter project, because it takes much longer time than most people are aware of.
- Draw a wiring diagram before you start and update it as you go along. While you are building its easy to remember all details, but in 10 years when you have to correct the first errors, you don't stand a chance if the documentation isn't up to date.
I did the job on my own bike a couple of years ago, from the following conditions.
- 3 separate systems: Power production, power consumption, and ignition.
- Power wires and control wires separated by relays wherever possible.
- All components and connectors should be marked according to the diagram.
- I wanted the diagram to be a proper chart, not the usual spaghetti chart that's impossible to use for fault finding.
If you need more inspiration, you can see my wiring diagram here (133KB), but note that its not directly transferable to a standard Guzzi. Its in .pdf format, so you need "Adobe Acrobat Reader" to read it. (Free download from Adobe)
Leo's experiences
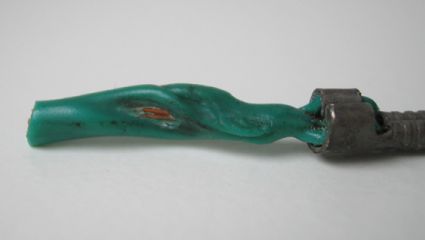
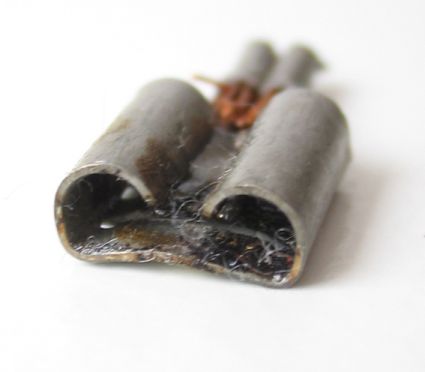
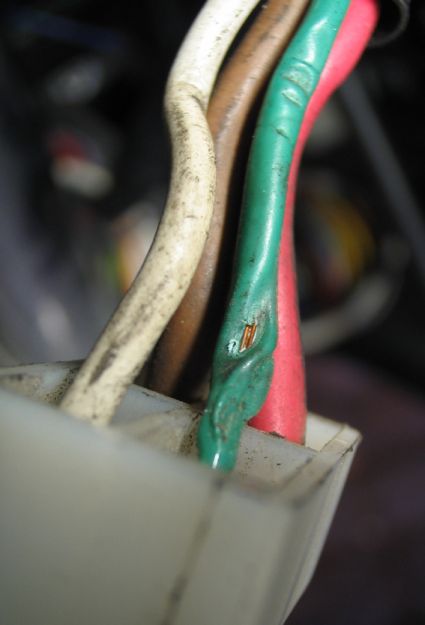
Leo knows about repairing old Guzzi's Wiring - and have taken a couple of nice close-up pictures.
Problem:
- Can't keep battery fully charged when running full headlights. OK for a while, but battery slowly drains.
- Can keep voltage up when only position lights are used.
- AC from generator is OK and voltage on the battery reads 14 V when running high idle, but as soon as the lights are switched on the voltage drops.
- First repair attempt was to change the regulator which helped a little, but not enough.
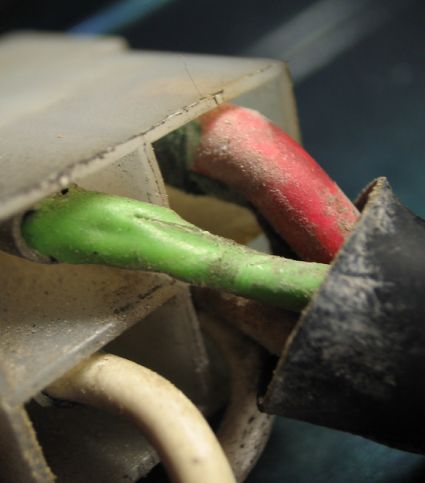

Solution:
- The connectors on the relay looked like if someone had tried to weld them (See pictures)
- New connectors and/or cleaning of connections.
- Seek and you shall find – open ALL connectors, inspect, clean or renew.
- Look for insulation that has partly melted, a sure sign of a bad connection with a following rise in current = HEAT.
