Cable soldering
Moto Guzzi V700, V7 Special, Ambassador, 850 GT, 850 GT California, Eldorado, and 850 California Police models
Okay, so here is what I did to make custom length clutch cables for my Suzuki DR350. I'll be doing something similar for my Ambassador soon, too.
- DISCLAIMER - I am not an expert at making cables. This was my first go at it and, so far, it seems to have worked out very well for me. If you are an expert at making cables, you may very likely find errors in my approach. Follow these instructions at your own risk.
- ENCOURAGEMENT - I had a lot of fun doing this and I enjoyed the process. I will definitely be making more custom length cables in the future for my Moto Guzzis.
- I started with my existing OEM Suzuki clutch cable. It already has the short length that fits perfectly into the handlebar lever, the mid-adjuster, and the specially bent
tube
near the engine. I didn't want to try to replicate any of that. - Cut the cable and remove it from the sheathing.
- Place the specially bent
tube
in the bench vice. Use a Dremel type tool to make a length-wise cut where the tube is crimped to the sheathing. Then, make a small cut perpendicular to this cut at the base of the crimp (furthest from the where the sheathing enters the tube). Pry this little piece open and pull out the sheathing. - Place the mid-adjuster in the bench vice. Use a Dremel type tool to repeat the process you did above.
- Cut your new sheathing to the length you want it to be. I used an angle grinder to cut the sheathing. Then, I cleaned up the end using a bench grinder. Make sure the end is flat, perpendicular to the length of the sheathing, and without burrs. Also, when cleaning it up on the bench grinder, go slow. It is easy to generate too much heat and melt the inner lining. But, go slow and you won't have any trouble.
- Insert your new sheathing into the mid-adjuster and special tube. Make sure it is in there the entire way. I measured the depth and then put a piece of tape on my sheathing. Once it is in there, use a pliers to crimp the metal back in place the best you can. Then, use a small worm-drive hose-clamp to really crimp it tight again. This approach isn't my favorite, but it seems to be working out fine. And, I think it is very important not have have movement in those areas.
- Now for the new cable. I started with the end at the transmission. I used a two-piece cable end at this location (see photo below). There is a piece that is soldered to the cable and then the main pivoting piece fits over it and is free to rotate. The piece that is soldered to the cable is too long. So, I used the Dremel to shorten it so that it would not protrude from the bigger piece. Once you have the piece you need to solder in place, splay the ends of the wire such that the end cannot pull off the cable. This provides a lot more surface area for the solder to get to. Doing so also creates a "wedge" such that the solder/cable cannot physically pull back through the cable. How I soldered:
- Dip the cable/end into acid-type liquid flux. I was careful not to dip any deeper than the fitting.
- Immediately dip the cable/end into my 50/50 tin/lead solder.
- Allow to cool
- Clean up any excess solder/wires with my bench grinder and wire wheel.
- Now for the end at the handlebar lever. This was a single-piece end (see photo below). The approach is the same as the above. Just make sure that you have everything assembled before you start splaying the end of the cable. Don't forget the special little plastic piece that wraps around the cable end - very important.
- Once complete, thoroughly clean both ends with a baking-soda/water solution to neutralize any remaining acid from the flux.
A few important notes:
- The cable is 2 mm in diameter.
- The outside diameter of the sheathing is 7 mm.
- The end at the handlebar lever is 6 mm in diameter and 10 mm long.
- The end at the transmission is 8 mm in diameter and 10 mm long.
- The cable free length is 150 mm (with the adjuster in its shortest position).
I ordered these parts from Flanders:
- Part number 610-03122 - 0.08 inch (2 mm) diameter wire, 1 × 19 strand.
- Part number 610-03336 - OD 0.268 inch (7 mm), ID 0.128 inch (3.3 mm) rectangular chrome steel wire core with nylon inner liner and abrasion resistant plastic cover for use with 0.1 inch (2.5mm) wire.
- This worked perfectly well with 2 mm wire. I used it because I wanted the 7 mm OD sheathing.
- Part number 620-25680 -Small barrel end fitting drilled for 0.08 inch (2 mm) wire (610-03120, 03122), OD 0.235 inch (6 mm), length 0.4 inch (10.2 mm).
- This is used for the end of the cable that fits into the handlebar lever.
- Part number 620-23600 - Barrel end fitting to be used with wire assembly 601-10301, OD 0.312 inch (7.9 mm), length 0.35 inch (8.9 mm).
- This is used for the end of the cable at the transmission end.
- Part number 620-26298 - Shanked end fitting for use with 620-23110 and 620-25880 barrel fittings, drilled for 0.1 inch (2.5 mm) wire (610-03140, 03142), OD 0.25 inch (6.35 mm), length 0.475 inch (12 mm), shank diameter 0.123 inch (3.1 mm).
- This is used in conjunction with the above cable end.
- This one is not stated to work with part number 620-23600, but it is working fine. I think I messed up when placing my order or the other part simply wasn't available.
Other things I picked up for soldering:
- I purchased the 50/50 solder from my local Ace Hardware store. This is the stuff I used:
- Alpha Fry 33505
- Flanders also sells solder, but I forgot to order it.
- I purchased the acid-type liquid flux from my local Ace Hardware store (a lot less expensive than on Amazon). This is the stuff I used:
- Alpha Metals 51022
- Flanders also sells flux, but I forgot to order it.
- I purchased a small cast iron skillet for melting the solder with my propane torch. Worked a treat. This it the one I ordered:
- Lodge 3.5 inch Cast Iron Mini Skillet
- You can also buy a dedicated solder pot for around $30 on Amazon.
Online video that I found most helpful:
Very long, but the best I've found. Worth the time if this is your first try.
There were a number of other sites that I googled, but none really laid it all out in as much detail as I wanted.
Photos:
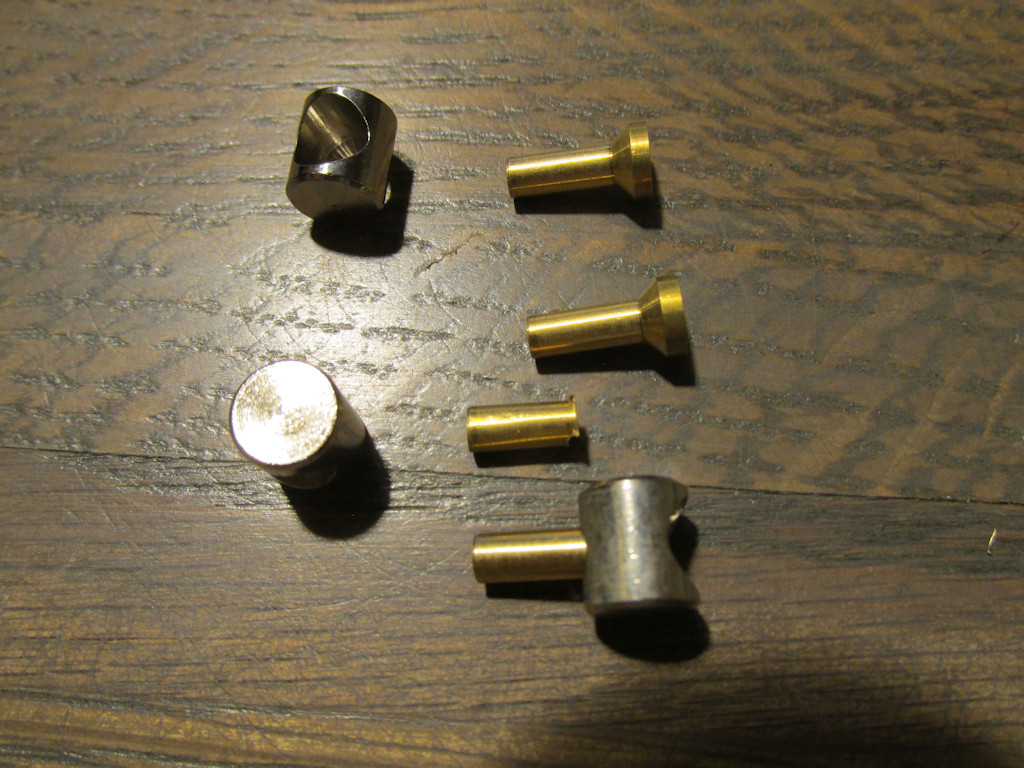
Photo courtesy of Gregory Bender.

Photo courtesy of Gregory Bender.
Thanks to Charlie Mullendore of Antietam Classic Cycle who posted this information on the old Yahoo! Loopframe_Guzzi news group (which has now moved to Groups.io).