Moto Guzzi V700, V7 Special, Ambassador, 850 GT, 850 GT California, Eldorado, and 850 California Police models
Created:
Updated:
There are a number of ways that every generator bracket should be improved BEFORE bad things happen (and bad things will eventually happen if improvements are not made). I've labeled each of the following with a required or recommended rating that reflects my personal belief about each modification.
Generator belt
Required. Don't over tighten the generator belt. It is far better for the belt to be too loose rather than too tight. Running the belt too tight will put a lot of pressure on the generator bracket and can crack the bracket or pull the bracket securing bolts out of the block.
Generator bracket securing bolts
Required. The two bolts that secure the generator bracket to the engine block should be changed to studs. McMaster-Carr part number 98867A310 is what I recommend (30 mm × 8 mm × 1.25 mm). Screw the long end into the block with high strength thread locking compound. I've recently been made aware of generator brackets that are 10 mm thick. This is much thicker than the original Moto Guzzi bracket. If you have such a bracket, make sure that you purchase studs of a length long enough to for you to also fit the necessary nuts and lock washers.
Damaged threads in aluminum engine block
It is not uncommon for the threads to become damaged within the aluminum engine block. While it may be technically possible to weld, drill, and tap the engine case, it is often easier to fit a threaded insert made of steel. Threaded inserts have an excellent track record and hold up very well.
I am very fond of using the Time-Sert brand of threaded inserts. These are excellent quality. I"ve used them many times in many applications and I've never been let down.
If the hole is too big for standard sized Time-Serts, you can fit Time-Sert's oversized Big-Serts. McMaster-Carr part number 97120A240 is a less expensive approach for dealing with oversized holes as it does not require special tools.
Nuts and lock washers
Required. I have had good luck using heavy-duty serrated (toothed) locking washers in combination with nylon insert locking nuts. A better alternative to using serrated (toothed) locking washers might be Nord-Lock washers. McMaster-Carr has a variety of sizes available. Thanks to Patrick Hayes for recommending the Nord-Lock washers.
Generator locating pin
Required. There is a locating pin at the front of the generator that fits into a corresponding hole in the engine block. Make certain that the locating pin is well secured into the body of the generator. The use of medium strength thread locking compound is a good idea. Also, ensure that when the generator is mounted in the bracket, that the body of the generator comes into contact with the curve in the engine block. This curve serves to support the front of the bracket and there should be firm contact between the bottom of the generator and top of the engine block.
Generator bracket
Recommended. Weld an additional brace to the bracket that extends to the front-most distributor securing bolt. This one modification adds to the strength and stability of the generator bracket. It also greatly reduces the stress on the two generator bracket securing bolts (which should be changed to studs).
Thanks to Larry Dew for sending me his write-up and photos. In Larry's own words:
Many folks have done this improvement, but I could not find a picture online.
Material:1 1⁄4 inch angle iron 2 1⁄4 inch long.
Procedure: With the generator removed, you will have good access to fit the angle bracket.
Cut the aft inside of the angle to approximately a 45-degree angle to remove the excess material and give you a good view of the distributor mount.
Hold the bracket on the distributor and up against the Generator mount.
I found I had to remove about a 1⁄16 inch from the outside edge of each leg of the angle iron to have it fit tight up against generator mount. A file is all you need.
Once the fit is good up against the generator bracket dill the hole for the distributor bolt. The centerline of the hole in this installation was 2 inch from the generator mount and 1⁄2 inch up from the outside of the angle iron. I drilled a 3⁄8 inch hole so it would allow some movement of the bracket. The Bracket provides down support for the generator mount so a larger hole is not a problem.
Bolt the bracket in place, tight up against the generator mount and scribe its location.
Unbolt everything and scribe both sides of the bracket for you welder. I clamped my bracket onto the generator mount with a wood screw clamp, which made it easy for the welder to tack it in place.
Once its welded, bolt the generator mount back in and check that the bracket is flush on the distributor mount and the hole is centered. If necessary enlarge or elongate the distributor bracket hole. A longer distributor bolt is a good idea for maximum thread grip.
Remove and paint it. It's complete!
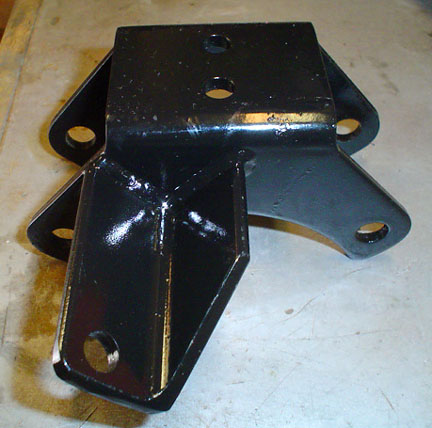
Generator Support Bracket (Generator Mount to Distributor Front Mount Bolt).
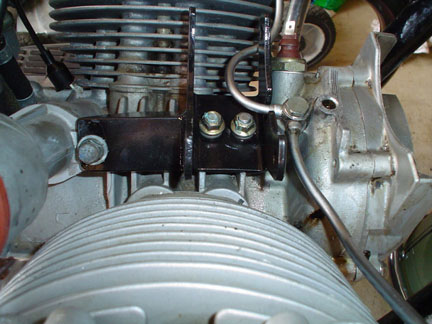
Thanks to Mac Dennis for posting this information on the old Yahoo! Loopframe_Guzzi news group (which has now moved to Groups.io). In Mac's own words:
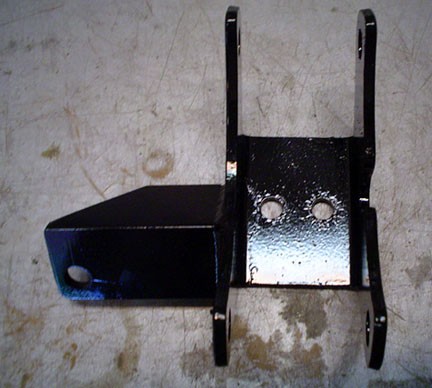
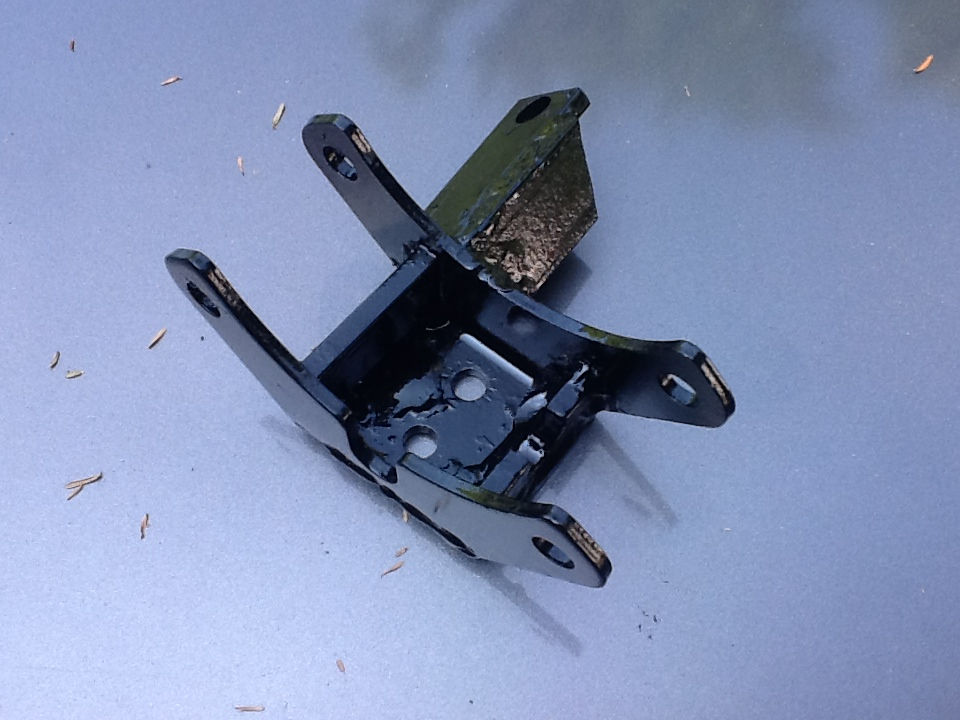
When I welded up mine alternator bracket I added the piece to the distributor as noted on Greg's site but also added bracing between the 2 support arms with a notch for the oil line. Very strong now.
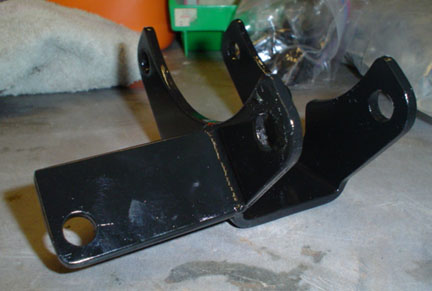
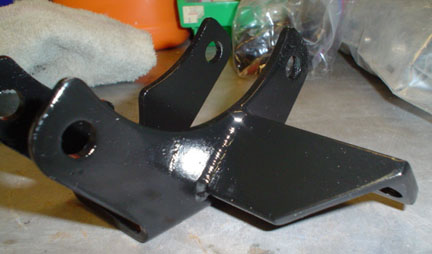
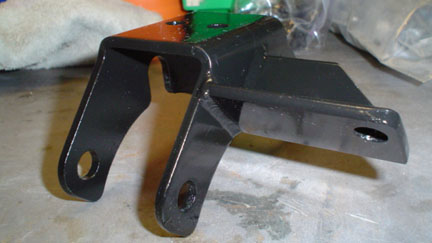
Generator bracket modified with additional braces welded in place.
Photo courtesy of Mac Dennis.
Generator bracket modified with additional braces welded in place.