Petcock repair - V700
Moto Guzzi V700, V7 Special, Ambassador, 850 GT, 850 GT California, Eldorado, and 850 California Police models
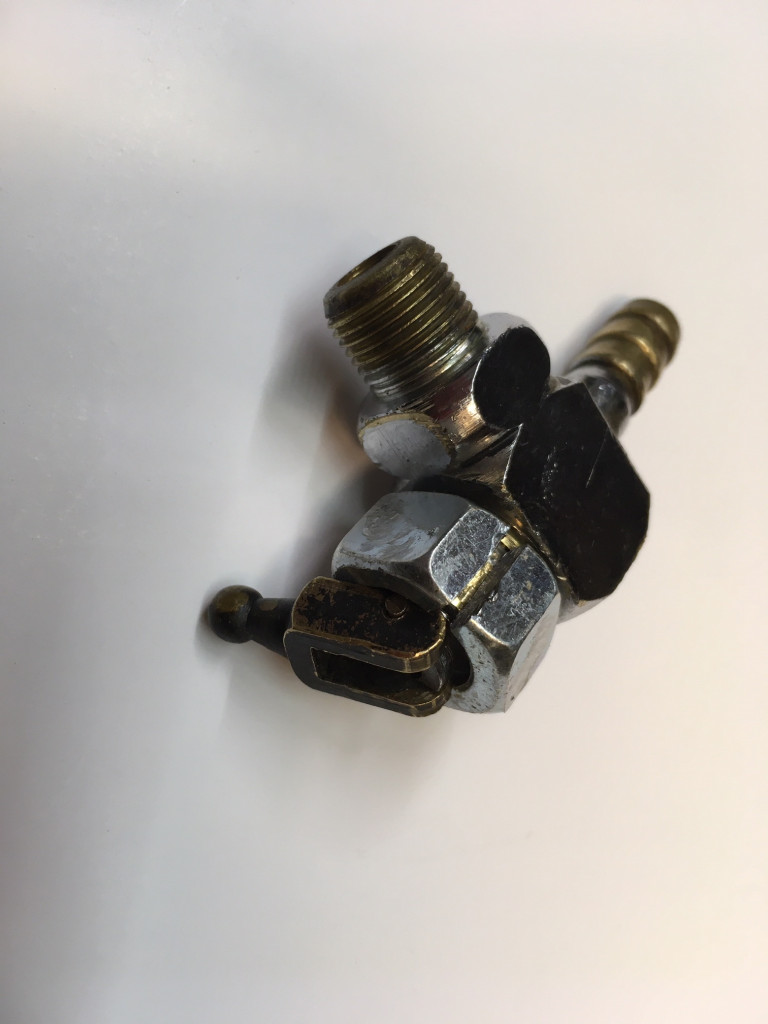
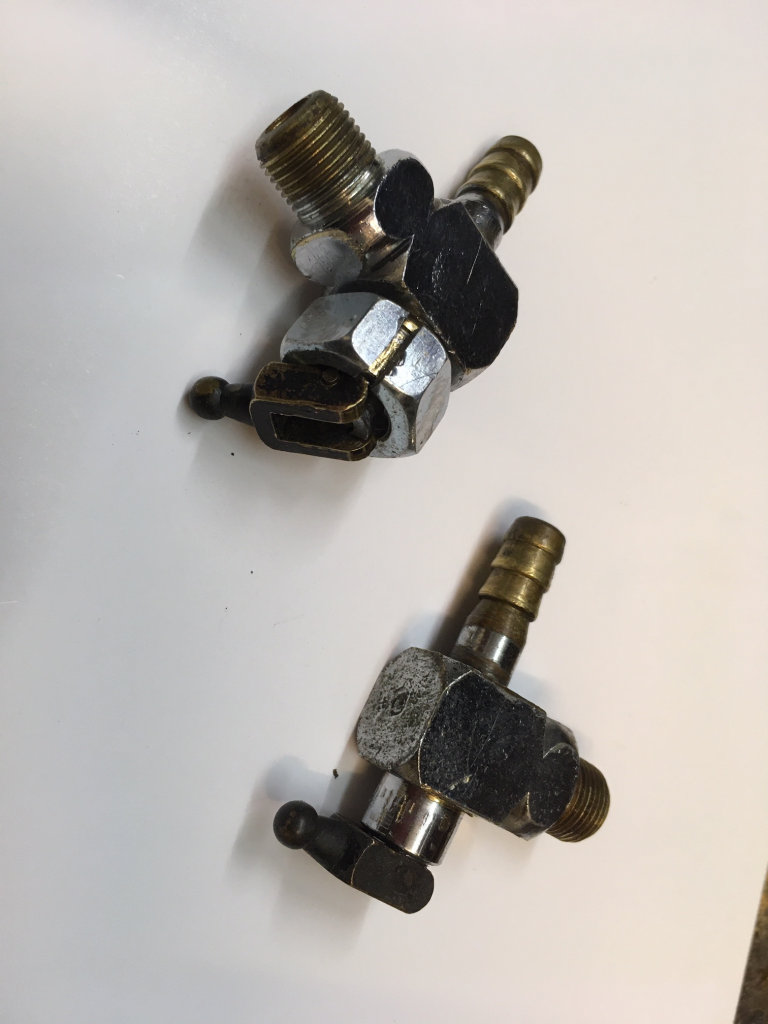
The petcocks used on the V700 are special. While they share the later thread size, they are actuated with a small lever and are much easier to operate than any replacement I've discovered. If you can rebuild yours, I highly recommend doing so. Thanks to Dominic Etzold of Symphony Cycles for sending me these photos and description of how he repaired his V700 petcocks.
Finally got around to rebuilding those petcocks. You need the following materials (I wound up using Buna-N instead of Viton due to availability of specific ). Attached are pics of the petcock in pieces and then fully assembled. Below are the materials and the steps to rebuild them. It was a little tedious, but I think only because I had to measure worn parts and then figure out sizes that worked, the actual assembly isn't bad at all. Maybe I'll make a few rebuild kits since I know have a bunch of weird parts that don't have any other use.
- McMaster-Carr part number 1171N175 - Square-Profile Oil-Resistant Buna-N 2 mm Wide, 4 mm ID
- McMaster-Carr part number 1986K3 - 302 Stainless Steel Compression Spring with Closed Ends, 1 inch Overall Length, 0.25 inch OD, 0.192 inch ID
- McMaster-Carr part number 1171N124 - Square-Profile Oil-Resistant Buna-N 1.5 mm Wide, 10 mm ID
- McMaster-Carr part number 86715K269 - High-Strength Oil-Resistant Buna-N Rubber Sheet 12 inch × 12 inch, 1⁄32 inch Thick, 50A Durometer
- McMaster-Carr part number 98381A418 - Alloy Steel Dowel Pin 1⁄16 inch Diameter, 7⁄16 inch Length
The steps:
- I used pliers to remove the valve actuator from the body of the petcock. Then had to grind off the edge of the dowel pin to remove it, it was peened.
Thanks to Joop van der Maden for sending me some additional information on what he had to do to remove the valve actuator from the body of the petcock. In Joop's own words and photos:
I managed to take them apart. I used a nut 12 mm which I drilled to a diameter of 12 mm and saw it through. I put the nut with the petcock in the vice. With a wrench 16 mm and a few taps with a hammer I got it loose.
The nut positioned on the petcock from a Moto Guzzi V700. Photo courtesy of Joop van der Maden.
The nut positioned on the petcock from a Moto Guzzi V700. Photo courtesy of Joop van der Maden.
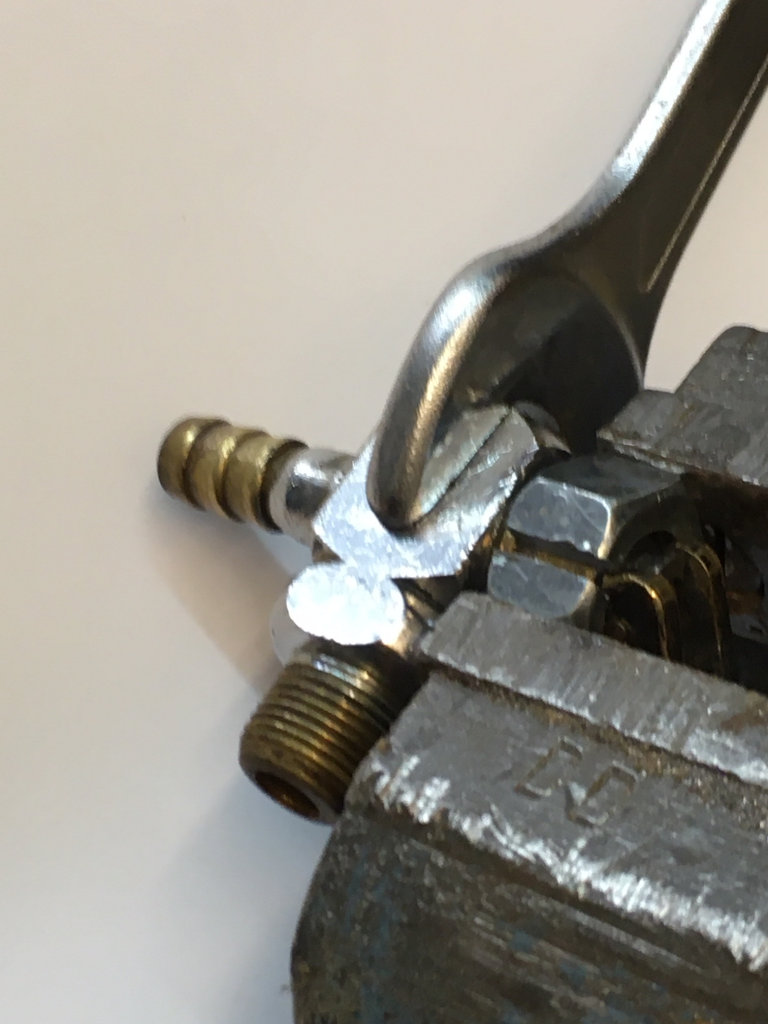
Removing the actuator from the body of a petcock from a Moto Guzzi V700. Photo courtesy of Joop van der Maden.
- The actuator consists of:
- 1 - 9 mm OD x 2 mm ID x 1 mm thick sealing gasket that attaches to the end of the plunger. I bought a 12 inch × 12 inch sheet of Buna-N 1⁄32 inch thick to make this myself.
- 2 - Square-Profile Buna-N 2 mm Wide, 4 mm ID × 8 mm OD. These go in the base of the actuator body to seal the plunger on the outer side of the petcock
- 1 - Metal washer, 8 mm OD × 5 mm ID × 1 mm thick. This goes on the inside of the actuator, on top of the 2 sealing and below the spring. This essentially protects the o-rings from getting torn up by the spring.
- 1 - 302 Stainless Steel Compression Spring 0.25 inch OD, 0.192 inch ID. This was the closest size I could find to the original spring. You have to cut the spring down to 16 mm - 16.5 mm in length to work with the plunger,
- 1⁄16 inch Diameter, 7⁄16 inch Length Steel Dowel Pin to secure the handle to the plunger.
- The petcock body consists of:
- 1 - Square-Profile Oil-Resistant Buna-N 1.5 mm thick, 10 mm ID. This seals the actuator to the body.
- 1 - 302 Stainless Steel Compression Spring 0.25 inch OD, 0.192 inch ID. This is the same spring used in the actuator, except this time it's not cut down. The original length is retained and is used to hold on the mesh filter.
- Everything was cleaned up pretty easily using brake cleaner. There aren't any small passages that require running a wire through or anything,
- Once it was cleaned up I put the 10 mm ID Square into the body of the petcock.
- Next I assembled the actuator. First you drop in the 2 4 mm ID Square profile Buna-N . I coated them with silicon as the first time I assembled them there was too much resistance against the plunger and the spring was closing it too slowly (you actually had to press the plunger in to assist the spring, after applying silicon it worked like it should).
- Then put the metal washer into the actuator body, on top of the 2
- Next, place the 16 mm length spring onto the plunger and insert the plunger into the actuator body, making sure the hole in the plunger will be viewable from the cutout in the back of the actuator body in order to insert the dowel pin.
- Insert the dowel pin to secure the plunger to the actuator body, then peen the ends of the dowel pin.
- Secure the homemade 9 mm sealing washer to the top of the plunger. I factory one that I measured had a 2mm ID, I tried using that originally, but there's play on the pin at the top of the plunger. Because of this, I made another one to use with a 1mm ID that I stretched over the pin. It's up to you what to use, but the factory one had a 2 mm ID.
- Tap the actuator body into the petcock body with a small hammer, ensuring it goes in straight.
- Test the petcock at the sink with water. The first time I did this I found that I didn't have the actuator pressed in far enough and had to tap it in some more.
- Once you are sure the petcock is sealed and functioning properly, insert the full size (1 inch) spring into the top of the petcock. I applied pressure and turned the spring like I was screwing it in to get it in without distorting it.
- Clean the mesh filter and insert into the spring. Again, a slight pushing and twisting motion was used. My screens were good, but I assume most will likely need to be replaced.
Hopefully this will be useful to someone. They're pretty crappy petcocks, and in the future I think I'd try to modify the newer style to work and get the benefit of a reserve option, but oh well.
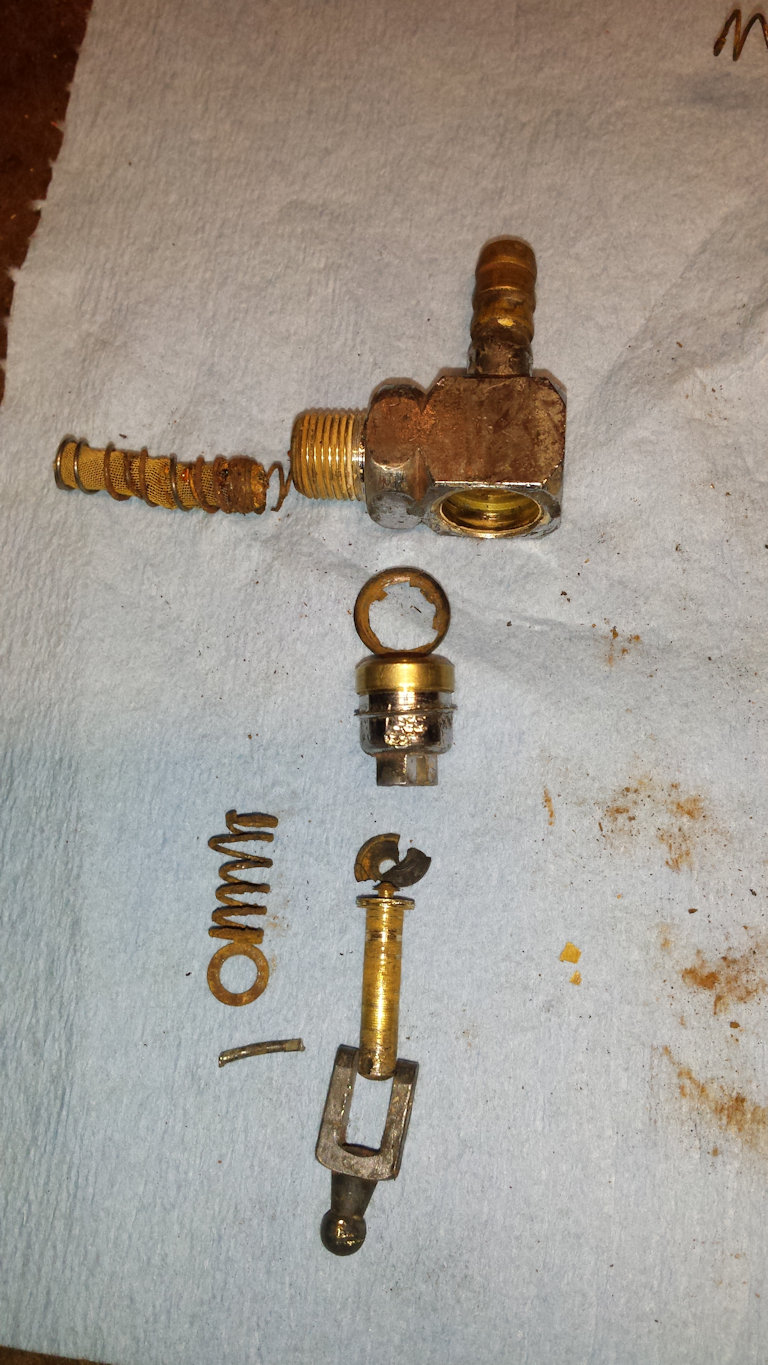
Photo courtesy of Dominic Etzold of Symphony Cycles.
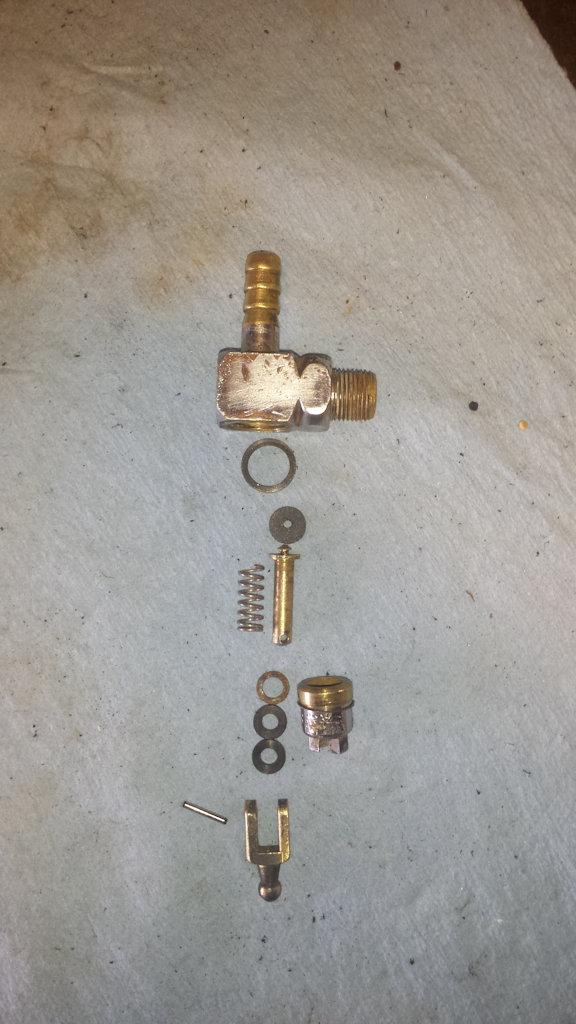
Photo courtesy of Dominic Etzold of Symphony Cycles.
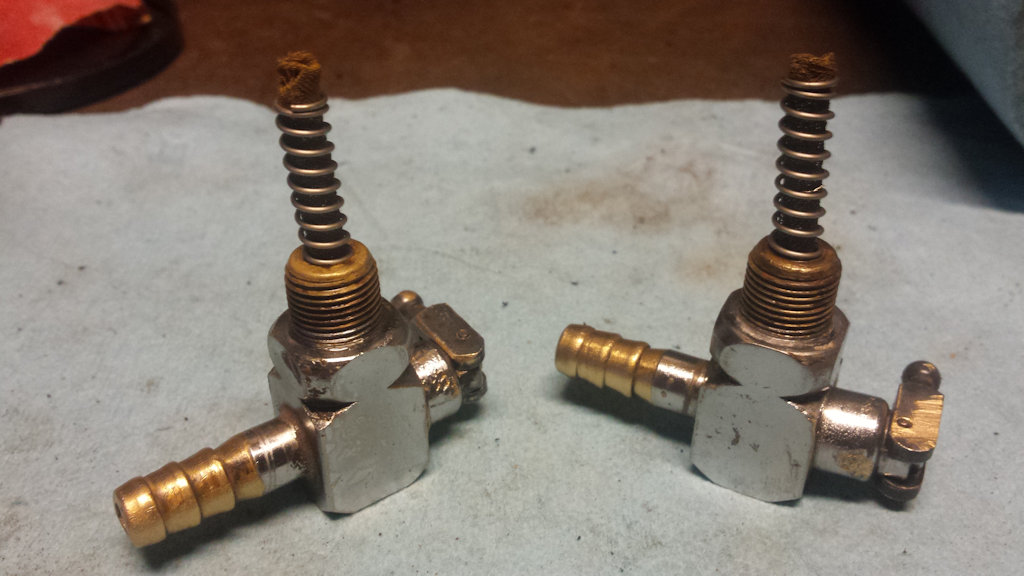
Photo courtesy of Dominic Etzold of Symphony Cycles.